| As way of explanation, I had the below posted on a well known Forum. My server crashed and I have just recently been able to restore my files. Thought I might park it here instead. Please note that these are several post over a long period of time. Quick and Dirty Method Step-by-Step Setup Digital Zoom Backgrounds Light Modifiers Black Backgrounds White Backgrounds Colored Backgrounds Focusing in Macro-Mode Alternative Photographing Methods Quick and Dirty Method Wanted to share my quick and dirty method for photographing flies. I needed a way take a quick picture of my flies while I was tying. It couldn't disrupt my tying sessions and it had to be simple. I came up with this plastic cup that I just slip it over the head of my vice and and add a small mirror inside the cup to bounce light back up into the fly. I place a piece of black flannel paper that I have laminated to a piece of cardboard as a background. I lean against it my rear desk lamp. The desk lamps are what I use for tying. The "flags" are held on to the lamp housing by velcro. I use them to keep glare out of my eyes while I tie. The camera is a CoolPix 5000 I got for $35 from ebay. It is mounted on a camera stand and has a shutter release because I am usually shooting at 1/15 of a second at 8.0. I should note that I am a professional photographer but that this rig is something most individuals could manage with a camera/shutter release, 2 desk lamps, a tripod and a plastic cup. A bit of Scotch tape and tiny mirror, from a discarded make-up compact. This is a photo of my overall rig. Please note the distance of the background to the fly. It is far enough back that it stays out of focus and shadows do not fall on it. I use flannel paper so that light does not reflect back and create glare. 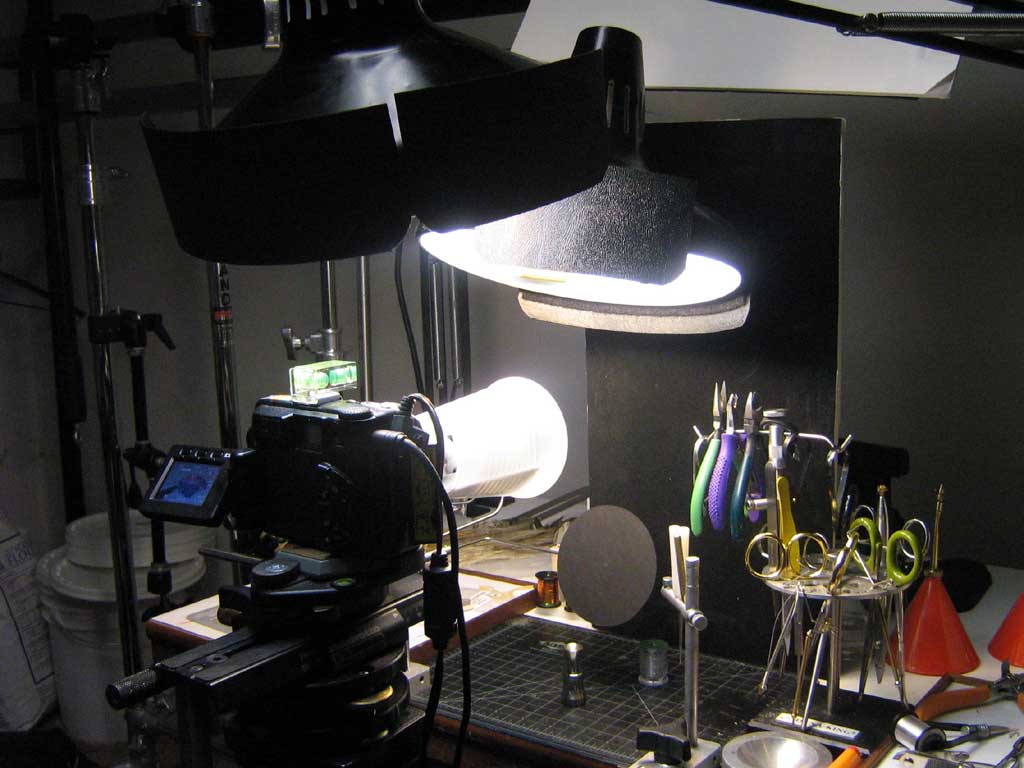 This is a picture without the camera in the way. The plastic cup creates abroad source of diffused light. I can still get a rim light that separates the fly from the background. 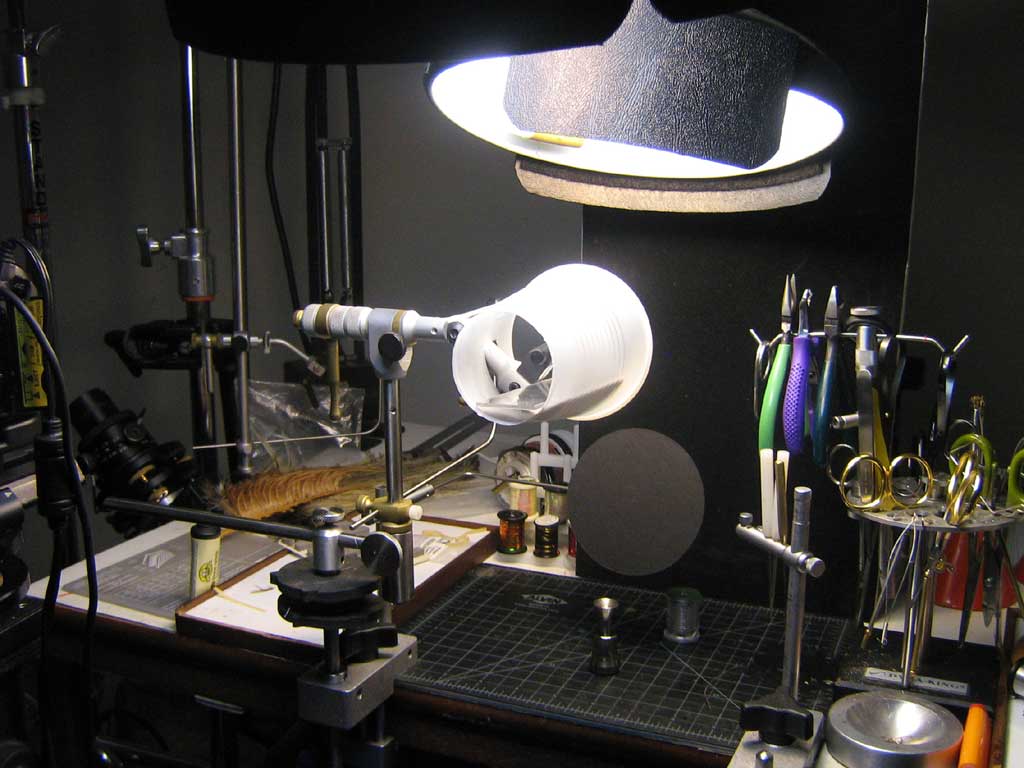 This is a closeup of the plastic cup. Please note the mirror under the fly. I will also tape a black piece of paper on the outside of the cup to block the light if the light is too bright "along the top of the fly and loose detail in the highlight. 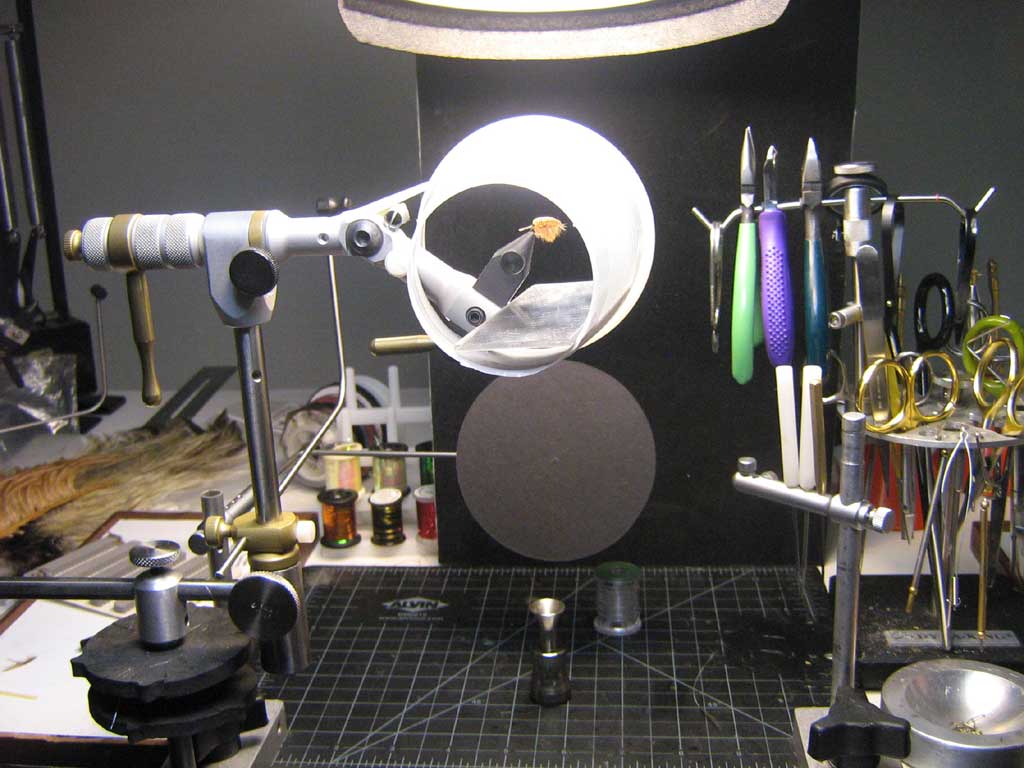 Just another note. If I wanted to use a colored background I could change the flannel to another color. I would let more of the backlight hit the background. I would probably add 2 more lights to get an even background. If you are curious how someone is light their flies you can often tell in the reflection if the fly contains a shiny surface such as a bead or a reflective wingcase. This is the results of this method. TOP 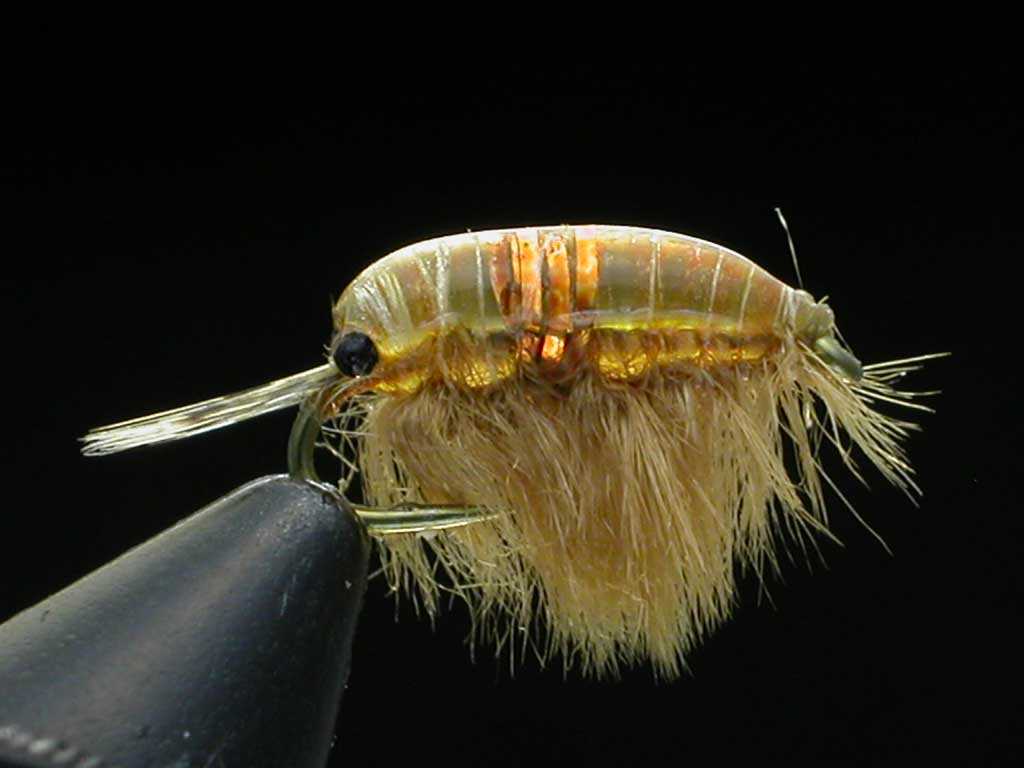 |
||||||||||||
Step-by-Step Setup Pictured here is my rig for a basic SBS. I suspend a piece of corrugated plastic above my tying vice and shine my desk lamps through it. A piece of frosted drafting mylar mounted in piece of cardboard would suffice. I am using a pair of scissor clamps and a rod on a stand to suspend the plastic. 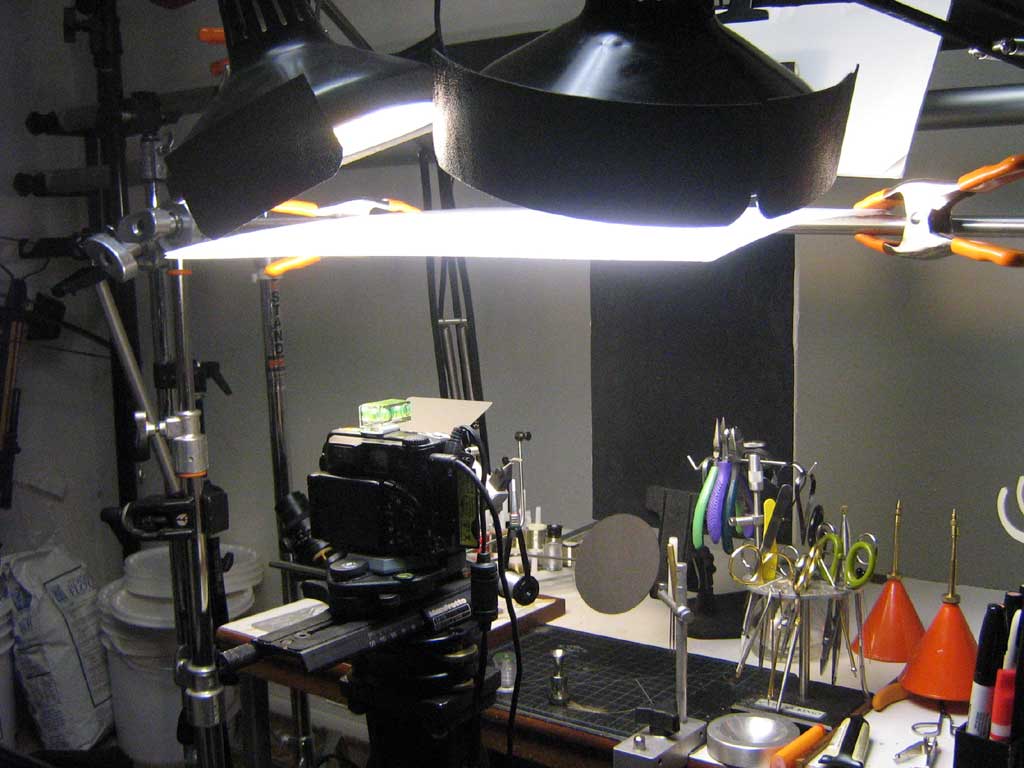 The biggest issue I have is bouncing light back up into the fly. I use a filter holder by Voss with a piece of mirror attached to one of the barndoors. This is a closeup of that feature. Please note the vice head reflected in the mirror. 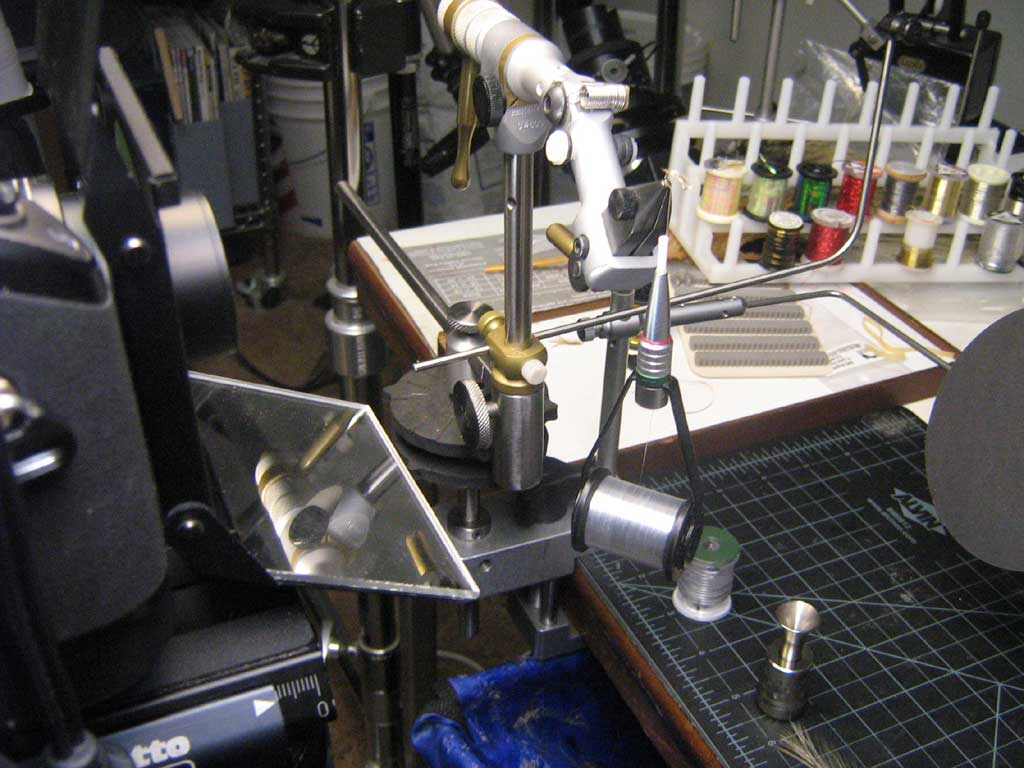 This is the results of this method. It allows me free movement around the vice. I can control the shutter remotely with my toes if I chose to keep the camera at my POV. You could also use large pieces of foamcore on both sides and underneath would help with the fill light. In this example the light is quite specular and wouldn't work with all flies. 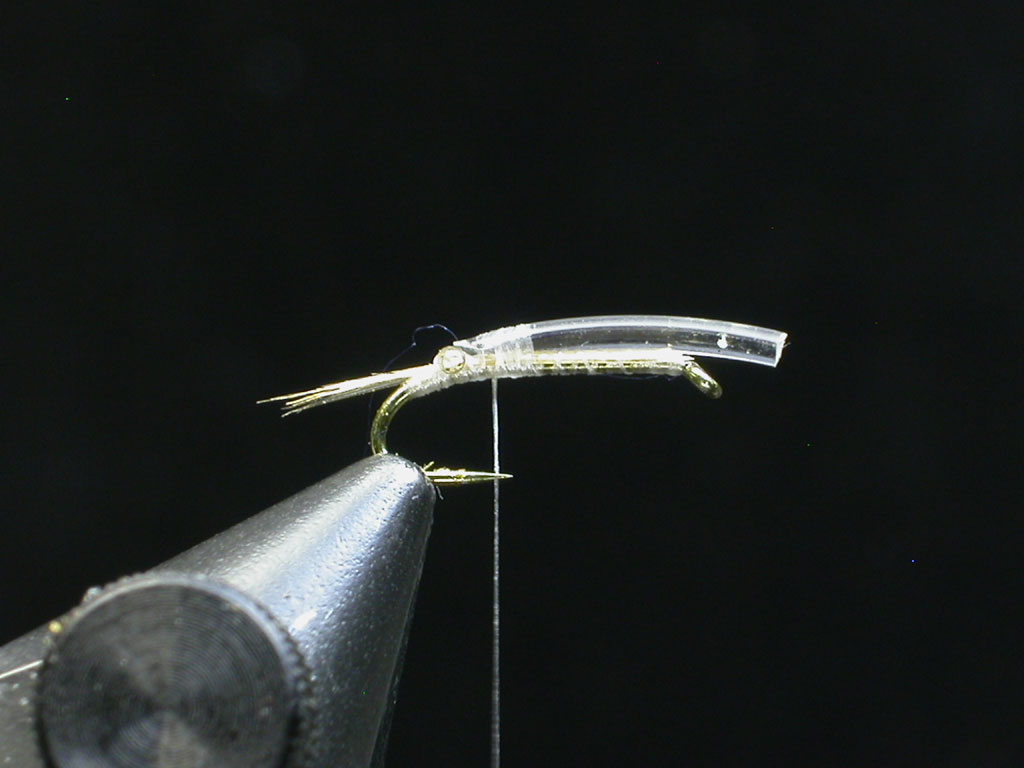 The mirror is inside of the cup right under the fly as seen in this picture. 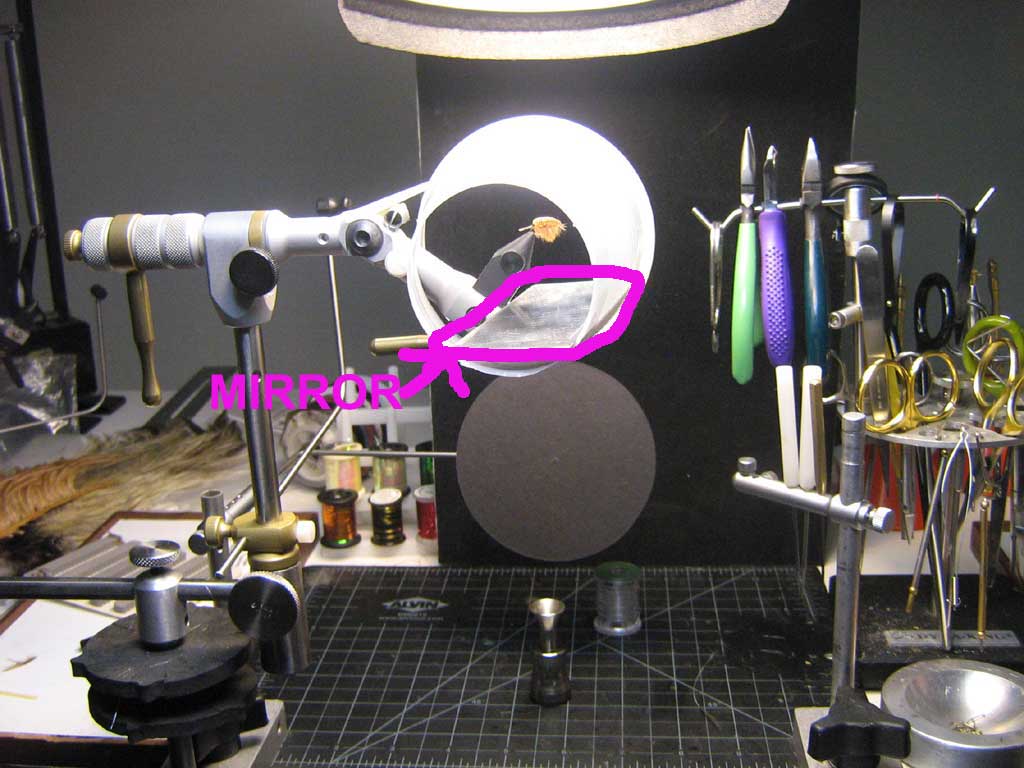 In this picture the camera is placed right in front of the cup. The lens almost pokes into the cup because it will focus that close to the fly, about 3 inches. The background is 8" to 10" from the back of the fly. It needs to be out of focus so that it does not distract from the fly. 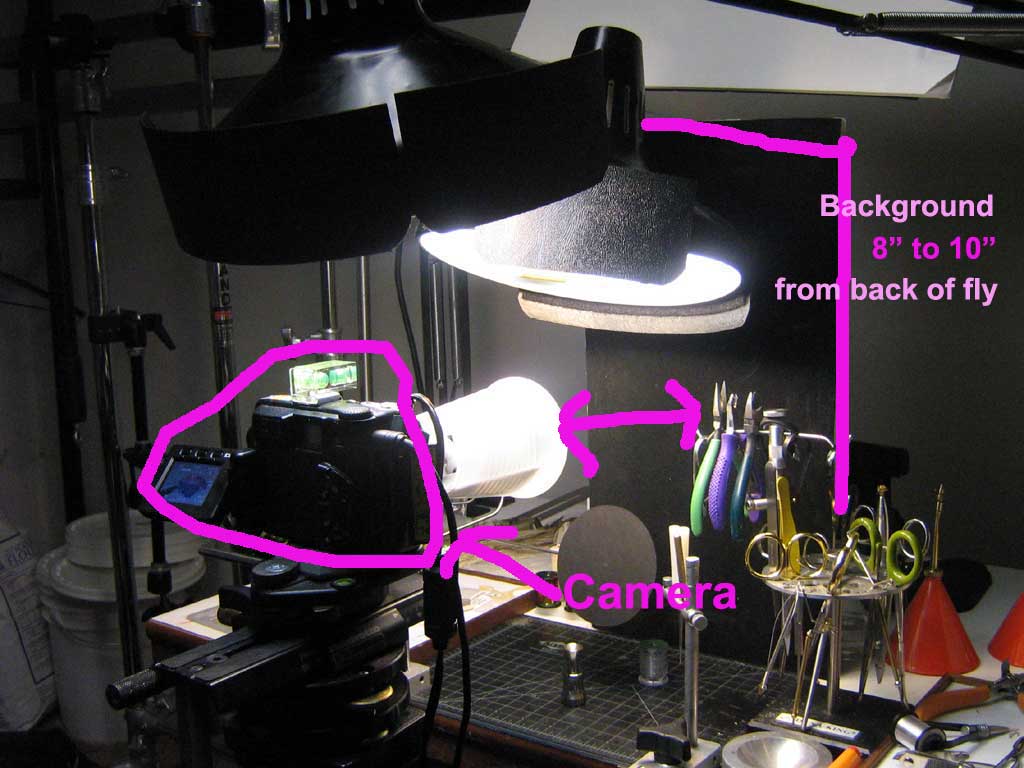 Also of note, it is a good idea to let your lights "warm up" a bit before you start photographing especially with the new fluorescent bulbs. About 5 to 10 minutes. I have noticed that they shift from the time your first turn them on till about 10 minutes into shooting. The nice part is that they don't melt my diffusers and I can actually bear to take photos during the summer. You might also check if you can view your viewfinder on a TV. I am fortunate that one of the cables that came with the camera has a pair of RCA leads off of it. I don't use it to judge color so much as where the exactly the main point of focus is. On my camera I really can't manually focus where I want it to. What I do is move my camera so that that it focuses on what I want it to (usually the eye of the hook), hold down the shutter half way to lock the focus, re-frame the viewfinder so that I can see the whole fly and then depress the shutter the rest of the way to capture the image. It still fools me sometimes but doing this digitally is so much cheaper and instantly gratifying than having to wait for film to come back from the lab. (I do miss my 4x5 and 8x10 chromes though.) TOP |
||||||||||||
Digital Zoom When taking pictures of flies it is important that you minimize the use of the digital zoom as much as possible. The use of the digital zoom degrades the quality of the image. Sometimes it can not be helped. I have to use the digital zoom when I take pictures of flies below a size 18 depending on the style of fly. By placing a rail with macro adjustments on your tripod, you can fine tune the framing of your fly moving the camera closer or further to the fly. If you add another rail perpendicular to the first rail you can adjust the left to right placement of the camera. The rail below is fairly inexpensive(less than $13 Ebay) and works rather well. 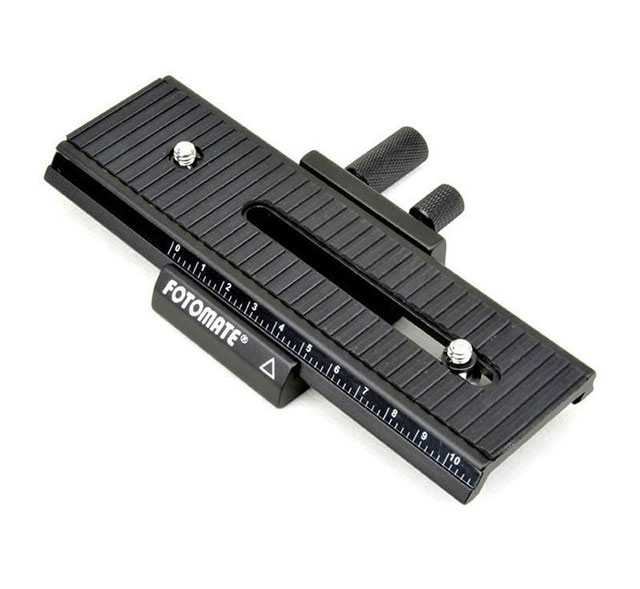 Below is an example of maxing out the digital zoom, in this case 4x. This is a size 28 Extended-Body Baetis Nymph. Please note the increased contrast, lack of detail in highlights and shadows. In order to get the fly to fill the frame I placed the camera just within the macro focusing range of the camera and made up the rest with the digital zoom. TOP 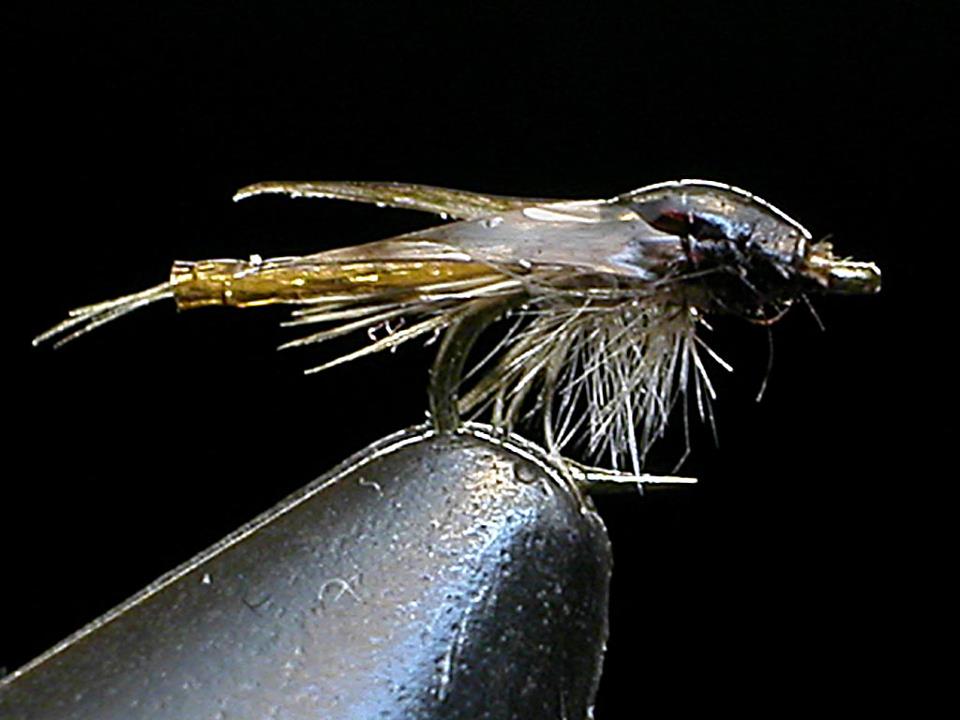 |
||||||||||||
Backgrounds You can achieve different background looks by changing the angle of the backdrop. In this photo the the top of the background is angled away from the top light. This vignettes the light giving it a gradient look. This also gives you a way to change how bright or dark the background is just by changing the distance from the light.I am using my "paper cup" as my "light tent". This is the setup. Please note how the top of the backdrop is angled away from the lap. TOP 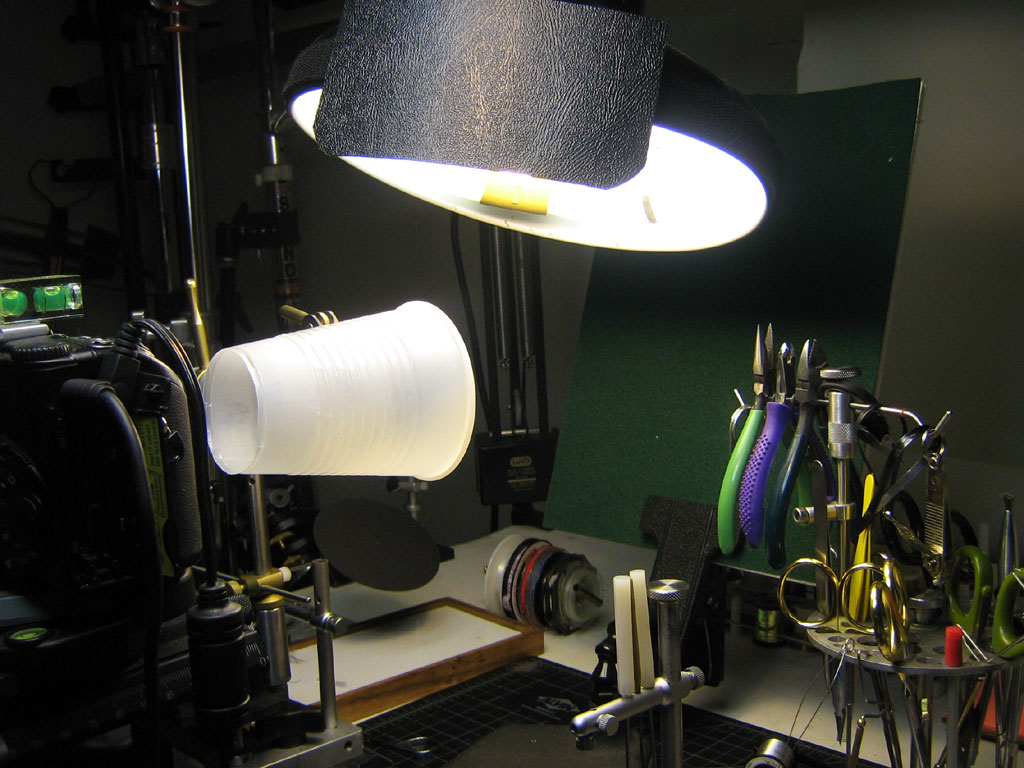 Light Modifiers Wanted to show you what happens to an image as "light modifiers" are added to a "set". What is pictured is the fly without anything but a main light and a background. The main light is pointing toward the back of the fly. This creates a highlight around the fly and separates it from the background Please note the highlight on the top of the fly that hides details of the fly along the top. The surface of the fly facing the camera is in shadow. The image is a bit contrasty 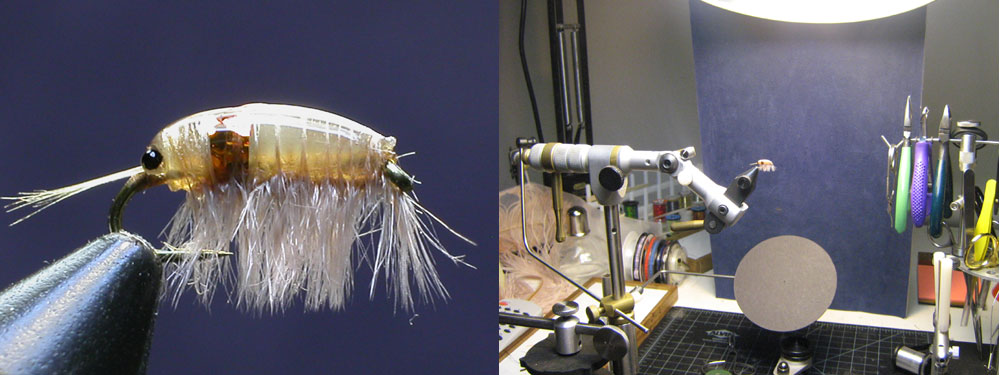 The plastic cup has been added to the set creating a light tent for the fly. It softens the contrast of the image. Much more detail can be seen on the top of the fly. Light is being "bounced" into the front of the fly and the hot spot is reflecting light. 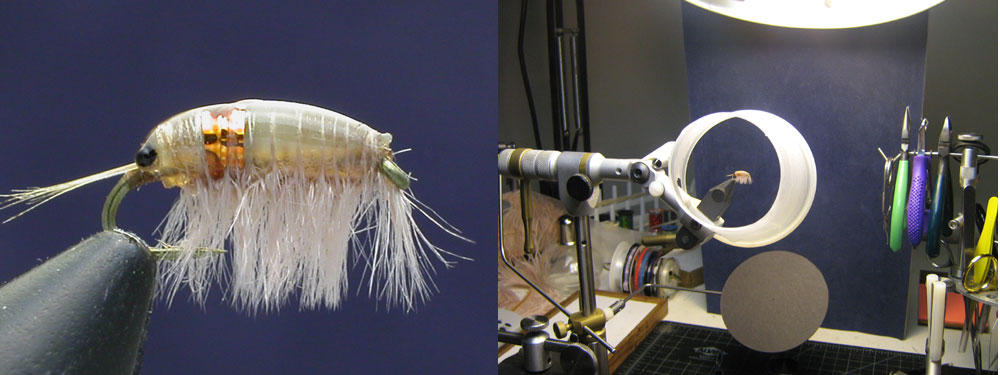 In this image a mirror has been added under the fly. You can see more detail in the legs. A bit of detail has been lost on the top of the fly. 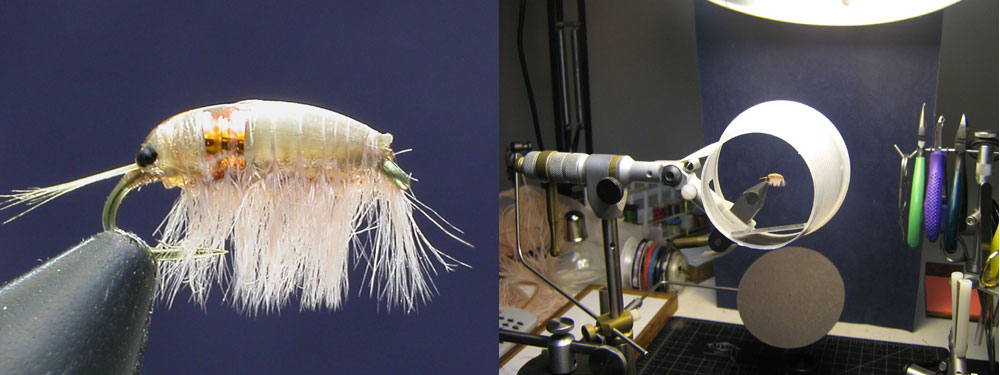 A small black card "flag' has been added on the top of the cup. It cuts a portion of the light and once again lets you see more detail on the top of fly. Please note: The exact position and size of the black card on top is determined by looking thru the viewfinder. You move the card front to back and looking for the effect that you want. Generally. you want the card to "shade" the fly so that you can see details in the top of the fly. This is the final image. TOP 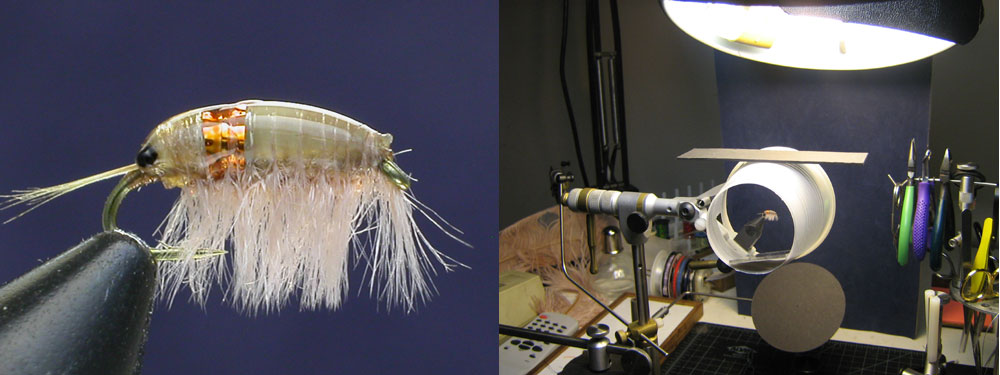 |
||||||||||||
Black Background Photographing a black fly on a black background creates some unique challenges the greatest being creating contrast between the background and the fly. By aiming your lamp so that it is actually pointing towards the camera creates a "rim light" around the fly defining it against a black background. The key will be to shade the lamp so that the light does not point directly into the camera lense and create flare. A strip of black matte board is used to shade a portion of the top of the fly to cut the amount of light reflecting off of the top of the fly. This helps to retain details on the top of the fly. TOP 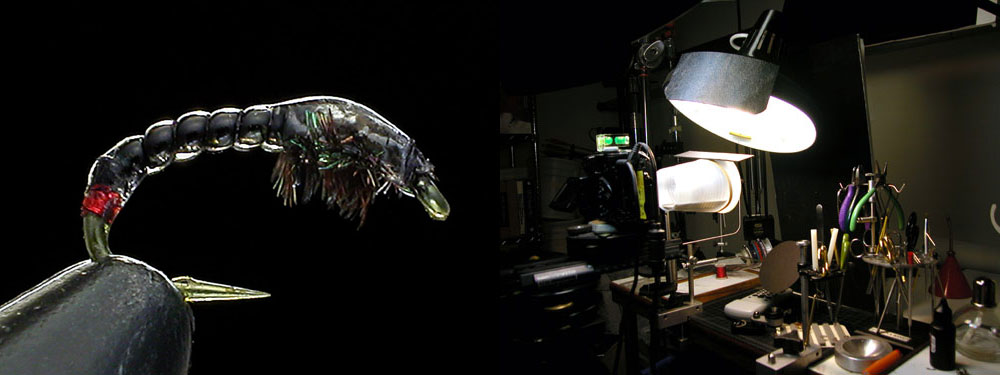 |
||||||||||||
White Backgrounds Photographing a white fly on a white background can also be a challenge. Once again contrast is needed to define the "white" clear tubing against a white background. This time two pieces of black matte board are placed on top to block light. What also is happening is the shadow of the black matte board is reflecting in the clear tubing further defining the edge of the abdomen of the fly separating it from the background. TOP  |
||||||||||||
Colored Backgrounds The previous examples illustrate the two extremes. This last example illustrates successfully photographing a fly on a similarly colored background. The same principles apply. Separate the background from the fly using a rim light. Use a "large" light tent to diffuse the light and reduce contrast by adding light into the shadows. Use flags to reduce the specularity(shininess) of the highlights and increase detail. TOP 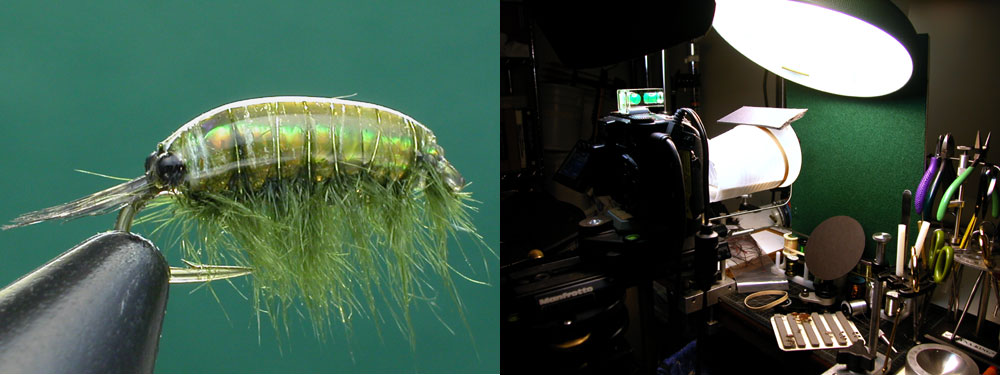 |
||||||||||||
Focusing in Macro-Mode The auto-focus in point-shoot cameras in macro-mode sometimes has difficulty focusing on the primary object. You can "fool" or at least help the auto-focus by placing a contrasting colored card directly behind the fly(you can also just use the palm of your hand). Hold the card right behind the fly(or field plane of focus). Slightly depress the shutter button.(The auto-focus will focus on the card and stay locked on the object.) Remove the card and depress the shutter button completely. TOP 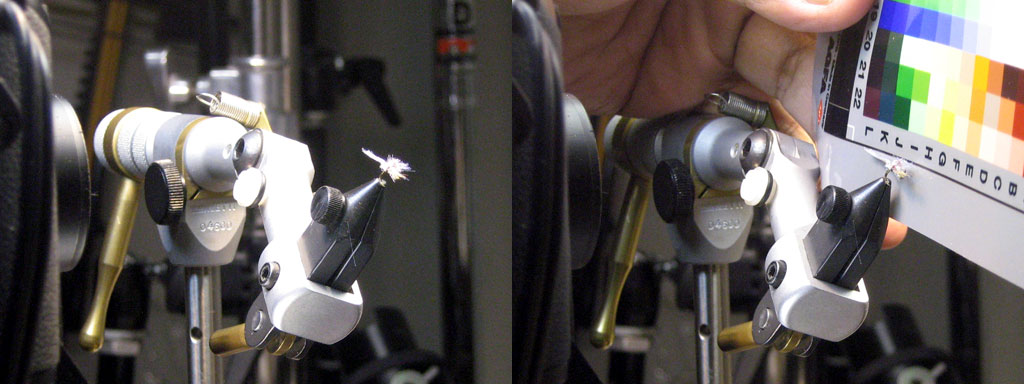 |
||||||||||||
Alternative Photographing Methods Wanted to show you an alternative method for photographing your flies. The fly is placed directly on the photographed surface. The first example shows the fly being lit by one light source using a tying lamp. As you can see the fly throws some deep shadows and obscures some of the detail. On a white background it is not as evident but on a colored or dark background details of the fly would be hidden.  In the second example once again the fly is lit by one lamp but 3 fill cards have been placed around the fly just out of view of the camera lens. The fill cards create a giant light box decreasing the shadows, flattening the contrast and allowing the viewer to see the details in the fly. An additional fill card on the top (without obscuring the light) and to the side would also decrease the amount of shadow even more. One of the caveats of this method is that shiny materials such as flashabou or tinsel will not look as shiny because their surfaces need contrast to look shiny.  Another method for photographing your flies is by "floating" them over a background. Pictured here is a piece of non-glare plex suspended between 2 stacks of plexiglass disks. The key piece here is to watch for the reflections of the camera and lights in the view finder. You can also intensify the colors by using a polarizing filter over the lense. This is a very quick and dirty method allowing you to change the backgrounds very easily. You can easily photograph multiple flies in one scene by using a larger light source. Also, by varying the distance of the plexiglass "stage" you can control how much detail shows in the background. If you were to use a "clear" piece of glass you can better create the illusion of the fly "floating" over the background. TOP  |
||||||||||||
|
COPYRIGHT © 2007-2014 FLYTYINGCLIPS.COM ALL RIGHTS RESERVED
This site is best viewed with Internet Explorer 7 or Firefox 2.0. Flash Player 9.0 is necessary to view this site. |
||||||||||||